Lesson Plan Critique

Lesson is from: http://www.readwritethink.org/classroom-resources/lesson-plans/gist-summarizing-strategy-content-290.html?tab=4#tabs

2. Using the UDL Educator Worksheet as a guide, write a report, utilizing tables, to organize the information you identified above.

Instructional Activities

(what the teacher uses):

The teacher is using newspaper articles and is having students summarize the articles using the 5 Ws( Who, What, When, Where, and Why).  Students use the GIST template to complete their summary.

Location in Lesson (Intro, Through, Beyond)

Through

Potential Barriers:

Students may have a hard time picking up the 5 Ws and key information, even using the template. Students may also have a hard time focusing on the article or may easily lose their place.

UDL Remedies

  • Students can use multi-color highlighters to help them highlight the different things needed for their summary.
  • Students can use reading guides to help them stay focused and not to lose their place.
  • Students can convert articles into digital text and can use Natural Reader to have it read aloud to them.
Principle that is addressed

  • 3.3 Guide information processing, visualization, and manipulation.
  • 9.2 Facilitate personal coping skills and strategies
  • 2.5 Illustrate through multiple media
  • 1.3 Offer alternatives for visual information

The UDL components of this lesson make the classroom more accessible for all students. UDL is all about meeting the needs of individual learners. It emphasizes providing multiple means of representation, providing multiple means of action and expression, and providing multiple means of engagement. This impacts my future teaching and lesson planning because UDL is a key component of being an effective teacher. I want to try to use several UDL principles in every lesson I teach. I know this will require more time, creativity, and energy, but I believe it is worth the extra time. I believe it will be worth the extra time because it will provide a classroom where everyone can thrive as learners. I do not want my classroom to only benefit one type of learner, and using the UDL principles will insure that does not happen.
Windows Ease of Use Tools

Tools on Windows Vista:

Feature: How It Could Help:
Speech Recognition This could help a student who struggles with the demands of using a keyboard or a mouse, by reducing the amount they need to use it significantly.  It can help the student navigate around the computer and use the computer without feeling as much fatigue.
On-Screen Keyboard This keyboard is a visual on screen keyboard, which serves as an alternative to the physical keys.  You can also use another input device. This could help students who struggle with using the keyboard.
Mouse Keys Instead of using the mouse, you use the arrow keys on the numeric pad.  This helps students who have an easier time using the keyboard than a mouse.
Magnifier This allows you to enlarge a portion of the screen. Users can choose between magnification levels between 2 and 16. This helps people with visual impairments use the computer more easily.
Narrator This is a text to speech program that reads aloud text and icons to the user. This will help people with visual impairments or even people with learning disabilities.
Filter Keys This ignores rapid key strokes done in succession. This is good for people who may not have good control of their hands because
Visual Notifications This replaces system sounds with visual signals such as a flash on the screen. This tool is helpful for those who are hearing impaired.
Captions This tool provides text caption for videos and animations. This is helpful for those who are hearing impaired because it helps them to understand what is going on in a video.

I really appreciated this exercise because it made me aware of all of the tools that already exist on a computer.  I did not realize that Windows had as many accessibility features as it did until I experimented with the different tools. The Ease of Access Center is where the user is able to select different tools to use. It is easy to use the Access Center because it clearly displays the tools that are available to the computer user. The first tool I experimented with was the Magnifier. The Magnifier was helpful and I liked how you can adjust the magnification level. I also experimented with the on screen keyboard, which was easy to see. I liked the color contrast set up because I can see how it help students with visual impairments.  The narrator is helpful, but I did not like how there are not options with the changing voice. I also think it is interesting that Windows already has some speech recognition software, but can understand why additional speech recognition speech software is purchased. I also liked the filter keys because it is easy to accidentally hit the keys too many times and cause the computer to freeze. Overall, I was impressed with how many free features come with Windows. I will remember these tools for the future because students will have access to these accessible tools both on the school computers and on their computers at home.

Choice Board Creator

Our group got the chance to experiment with the Ipad app, Choice Board Creator.  First we looked at a website, that had examples of reminder strips. Reminder strips are simply pictures with audio or text that remind the student to do something. We created 3 different activities with this app, with 4 reminder strips each. This app was very easy to use and I can easily see how it would benefit students. I like how you take a picture to personalize the reminder strips. The first activity we made was a list of things to pack up from school.  I can easily see how students with organization difficulties could use this app to make sure they have everything they need before they leave. The next activity we made was about putting up hair. I think this application could also help students with fine motor difficulty or students who need to see something, in order to be able to do it. The last activity we created was about proper hand washing technique. We said this activity was for high school students, however, I believe that all students could benefit from this reminder strip series.  In the future, I hope my school has access to Ipads. I would enjoy using this easy and accessible application. I think students with a wide range of disabilities could use this app because of the great visual and audio reminders it allows the teacher to create.

SETT Framework

Tonight in class we got a chance to practice using the SETT Framework. We also watched an overview video on the SETT Framework done by Dr. Joy Zabala. SETT stands for Student, Environment, Tasks,and Tools. I worked with Emily on a case study about Josh. I found the SETT framework to be accessible and easy to use. I think it is helpful to first identify what the student’s current abilities are and to figure out what the student’s needs are. I also think the framework is good because it emphasizes context and looking at the student’s physical and instructional environment.  The next part of the framework is looking at the tasks the students need to and the last part talks about what tools, either low-tech AT or high tech tools that might help the student. It also brings in services that also may be helpful to the student. I know I will be using the SETT framework in the future and appreciated the overview and practice.

Low Vision AT

    As a teacher, I know I will encounter students with vision impairments, and most likely will even encounter students with severe vision impairments. I thought it was interesting to read about low vision magnifiers on one of the blog discussions. They were specifically talking about low vision magnifiers for younger students in the discussion thread. However, I believe that I can still use some of these tools and other tools geared more towards the older student. I followed one of the links that someone provided to a website on the Boost. The Boost is a personal video magnifier and is light weight and portable. Another tool that was mentioned was the American Printing House for the blind, which the lady said provides magnifiers for the blind.  I know there are also many other tools out their for students with low vision to use. This discussion, as well as this class has opened my eyes to the possibilities for students with low vision in my classroom. Before, I did not know much about helping students with visual impairments. In my own school experience, I have only seen teachers sit students closer to the board to help them with their vision impairment. In fact, I struggled with a vision impairment in school and I did not know that this technology was out there. As a teacher, I plan on looking more into magnifiers and other ways to help students with vision problems. 

DynaVox Max Discovery

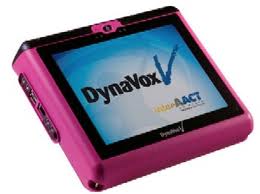
I used the Dynavox V Max, which is the open version device. The difference is that the standard version does not have Internet access and open does allow Internet access. The user can access the device through a touch screen, mouse, trackball, joystick, switch, or head tracking. The 3 types of communicators described in this video are readers, writers, and speakers. The pre-set age groups that are available are young child, child, teen, young adult, and adult. One of the cool features of this box is that a screen scene can be customized for a user from a jpeg. We experimented asking each other questions using the board. We asked each other what we like to eat, what we like to play, and where do we want to go using the teen board.  We then created a custom user, a teen female named Reese. We then used the board to ask each other questions about our favorite holiday and what we like to do when we hang out with friends. After this, we experimented with creating a custom button. At first, we had a hard time figuring out how to customize a button. We Googled how to create a button and it was actually much simpler than we thought it was originally.  We created a button for paint brushes, under the classes section and art. I like how this tool is so geared toward the individual because you can customize it for their needs and interests. This is one of the tools biggest strengths. I also liked how there was an option to change the voice to either female or male. It also had multiple female voices and multiple male voices. I also liked the touch screen because I think it makes the device accessible. The DynaVox Max also comes in 5 different colors, so the student can select which best suits their personality.

After experimenting with the DynaVox Max, we looked at the Dynavox website. We looked at two more recent models: The V Max + and Maestro models. The Maestro was a sleek and nice looking device. It looks light weight and has an integrated camera, so you can take pictures with the device. It also has Wi-Fi and Blue Tooth capabilities. The V Max + looks nice, but not as nice as the Maestro.  The V Max + also has Blue Tooth and WiFi, but does not have as many features as the Maestro. If I were to get a DynaVox for a student , I would want to get the Maestro.

dynavox

Organization AT Presentation

I enjoyed this presentation by Sandra McNally from Temple University on AT Organization. I personally struggle with organization so this information is not only helpful for me from a teacher’s perspective,but also from a personal perspective.  I like it how she started by talking about low-tech AT. Most of the low tech AT I was already familiar with, but I think it is important to not downplay the use of planners, reading guides, and different color pens as tools for organization. I have used these tools and have also used these tools with my students.

Sandra went out to talk about higher tech forms of AT for organization. I think that Inspiration and Draft Builder are both tools I will be able to use as a secondary special education teacher. I think Inspiration is a wonderful tool for students who struggle with organizing their thoughts before writing a paper. I like Draft Builder because it is a good tool for helping students with proofreading papers. I also like it how this tool includes help with bibliographies because I know a lot of students struggle with creating a bibliography. I appreciated her pointing out tools in Microsoft Word. I have been using Microsoft Word for many years and had never noticed the “quick parts” tool. Quick Parts is helpful because it reduces the need to retype text that you want to repeat. I also have seen templates on Word before, but had not looked into them specifically. I think that the homework templates, as well as the to do lists will both be helpful in my future classroom.  The last thing she talked about was the different apps. I wrote down all of these apps because I am interested in trying them out. I especially liked the Springpad app, as well as the Remember the Milk app.

Techmatrix

For my search criteria, I selected reading for the content area. I used the secondary grade level. I selected Autism for my IDEA disability category. In the last category I selected multiple forms of text and notation, This is link I got to my tech matrix: http://techmatrix.org/product-search?body=&content-area%5B%5D=7&grade-level%5B%5D=14&idea-disability-category%5B%5D=16&instructional-support%5B%5D=32&title=&search=true

This matrix came up with 19 different products. Some of these products I was familiar with and others I was not. One of the products I was already with was the program Kurzeil 3000 because we discussed this application in class. One of the products I was not familiar with was called Cool Speech. Cool Speech allows the student to convert digital text into an audio WAV file. This is similar to Co Writer 6 because Co Writer allows you to convert digital text into audio as well.  Another product I learned about was SOLO, which is a program that helps students in all stages of the writing process. It features several editing features such as spell checker, topical word lists, and a homonym checker.  Although some of these products sound helpful, they can also be quite expensive. This program costs 500 dollars and many of the other products were also expensive.

Natural Reader

At first, I had a difficult time figuring out how to convert the e-text on Natural Reader. However, once I figured out how to convert the file, it was a simple process. The first time you look for is a button at the top that looks like a disk. It will say convert to mp3. You click the button and save the file to the mp3 format. You can then open your file in an mp3 and have it as an audio file. I think any student or teacher could follow a few simple steps to complete this process. I believe this is a helpful feature because it means that students can have access to a file in mp3 format on their own computer at home, which could help them in doing homework assignments.

https://docs.google.com/file/d/0Bw-AwX9fUdwPZ2pha0pzQVl3Rmc/edit?usp=sharing